* Squashed commit of the following:

commit 10957c41487023dc0b996a100b9ca11024ac7ea6
Merge: 3e54f7b edce98a
Author: Elijah Harmon <elijahharmon@gmail.com>
Date:   Thu Apr 14 16:45:07 2022 -0400

    Merge pull request #7 from wrp5031/feature/wade

    Faster analysis and softening of the aiming jitters

commit edce98a36982f83461c4569f4033401ea9a2c546
Merge: 05c9b17 3e54f7b
Author: Elijah Harmon <elijahharmon@gmail.com>
Date:   Thu Apr 14 16:44:21 2022 -0400

    Merge branch 'main' into feature/wade

commit 05c9b17ca50cbd1bdfe5a8d5a283d1b2c32ae4d3
Author: wade <wpines@clarityinnovates.com>
Date:   Thu Apr 14 16:39:26 2022 -0400

    Screen capture area is based around the center of the screen. Added headshot mode. If multiple people, there is logic to take the person that had a coordinate closest to the last recorded coordinate.

commit 3e54f7ba975b4691fed2f9f61b163fed0f7d54df
Author: Elijah Harmon <elijahharmon@gmail.com>
Date:   Sun Apr 10 00:02:39 2022 -0400

    Create requirements.txt

commit f1fa560e56ac6ed92e645b0b4c78dac08861459f
Author: Elijah Harmon <elijahharmon@gmail.com>
Date:   Sat Apr 2 19:54:37 2022 -0400

    Changed readme title

commit a84ac9a238d47518bb45d64e27354f3fe65073ec
Author: TazMatic <31835653+TazMatic@users.noreply.github.com>
Date:   Thu Mar 31 16:52:02 2022 -0400

    Fix win32api and yaml package names

commit 8e32d8bd309c9e6de926213499d766bdf3d10fc8
Author: Elijah Harmon <elijahharmon@gmail.com>
Date:   Tue Mar 15 16:54:36 2022 -0400

    Update about pressing Q

commit 3dc6835a9b33d7d27e9878b72550416b86fa2406
Author: Elijah Harmon <elijahharmon@gmail.com>
Date:   Tue Mar 15 16:48:20 2022 -0400

    Update Readme

commit ae24cc3f496e2a9c2810f2876c262c3bef46df09
Merge: 21d431d 42954e0
Author: Elijah Harmon <elijahharmon@gmail.com>
Date:   Tue Mar 15 16:42:44 2022 -0400

    Merge pull request #3 from RootKit-Org/dev

    Now using YOLO

* Added live view images at top of readme

* Added a variable for easy shifting of AA when in games like fortnite

* CPS printing is now toggleable

* Made quit key easy to adjust

* Added verbage for configuring settings

* Updated the TOC

* Removed some extra spaces
![]()
AI Aimbot


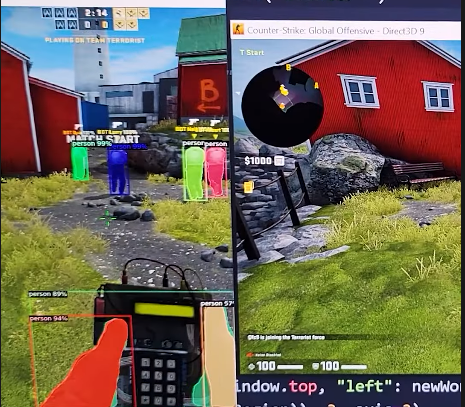
Table of Contents
Intro
AI Aimbot works in any game with humanoid characters and utilizes YOLOv5. (Mouse movements don't work in Valorant currently) It is currently 100% undetectable to anti-cheat systems due to it being visual-only in nature. You could be found cheating if you are manually reported by another player and your game is reviewed manually due to the botty looking aimming of an Aimbot.
This is meant for educational purposed and to expose how poorly prepared game developers are with these new waves on AI based cheats. Please share with this with your friendly neighborhood game dev so they can start patching.
Code is all in 1 file for easy of viewing and learning from.
Use at your own risk. If you get banned get rekted idiot
Adhere to our GNU licence, come on we are a nonprofit.
- free to use, sell, profit from, litterally anything you want to do with it
- credit MUST be given to RootKit for the underlying base code
Watch the tutorial video! - Coming Soon
Watch the shorts video! - https://youtu.be/EEgspHlU_H0
Join teh Discord - https://discord.gg/rootkit
Configurable Settings
*Default settings are good for most use cases. Read comments in code for more details.
CAPS_LOCK is the default for toggling on and off the autoaim functionality
videoGameWindowTitle - (CHANGES PER GAME) Window title of the game you want to play. Does not need to be the complete window title.
aaRightShift - May need to be changed in 3rd person games like Fortnite and New World. Typically 100 or 150 will be sufficient.
aaQuitKey - Default is q, this may need to be changed to another key depending on the game.
headshot_mode - Make False if you want to aim more toward center mass.
cpsDisplay - Make False if you don't want the CPS to be displayed in the terminal.
visuals - Make True if you want to see what the AI sees. Can help with debugging issues.
aaMovementAmp - Default should be fine for 99% of use cases. Lower the value, the more smooth the autoaim will be. Recommended range is 0.5 - 2.
confidence - Default should be kept unless you know what you are doing.
screenShotHeight - Default should be kept unless you know what you are doing.
screenShotWidth - Default should be kept unless you know what you are doing.
aaDetectionBox - Default should be kept unless you know what you are doing.
Current Stats
This bot's speed is VERY dependent on your hardware. We will update the model it uses for detection later with a faster one.
Bot was tested on a:
- AMD Ryzen 7 2700
- 64 GB DDR4
- Nvidia RTX 2080
We got anywhere from 20-45 corrections per second. All games were ran at 1920x1080 or close to it when testing.
ANYTHING dealing with Machine Learning can be funky with your computer. So if you keep getting CUDA errors, you may want to restart your PC in order to make sure everything resets properly.
REQUIREMENTS
- Nvidia RTX 2050 or higher
- Nvidia CUDA Toolkit 11.3 (https://developer.nvidia.com/cuda-11.3.0-download-archive)
Pre-setup
-
Unzip the file and place the folder somewhere easy to access
-
Make sure you have a pet Python (aka install python) - https://www.python.org/
-
(Windows Users) Open up either
PowerShellorCommand Prompt. This can be done by pressing the Windows Key and searching for one of those applications. -
To install
PyTorchgo to this website, https://pytorch.org/get-started/locally/, and Select the stable build, your OS, Pip, Python and CUDA 11.3. Then select the text that is generated and run that command. -
Copy and past the command below into your terminal. This will install the Open Source packages needed to run the program. You will need to
cdinto the downloaded directory first. Follow step 2 in the Run section below if you need help.
pip install -r requirements.txt
Run
If you have python and the packages you are good to go. Load up any game on your MAIN monitor and load into a game.
-
(Windows Users) Open up either
PowerShellorCommand Prompt. This can be done by pressing the Windows Key and searching for one of those applications. -
Type
cd(make sure you add the space after the cd or else I will call you a monkey) -
Drag and drop the folder that has the bot code onto the terminal
-
Press the enter key
-
Type
python main.py, press enter. -
Use CAPS_LOCK to toggle on and off the autoaim functionality. It is off by defualt
-
Pressing
qat anytime will completely quit the program
Community Based
We are a community based nonprofit. We are always open to pull requests on any of our repos. You will always be given credit for all of you work. Depending on what you contribute, we will give you any revenue earned on your contributions 💰💰💰!
We are always looking for new Volunteers to join our Champions! If you have any ideas for videos or programs, let us know!